Ground venison can be eaten in a virtually limitless number of ways - from burgers to tacos to spaghetti to meat loaf, or in one of a million types of sausage.
While backstraps and tenderloins get all the glory when it comes to dining on deer, elk or other venison, it's tougher cuts that make up most of the animal. These large, primal cuts of meat from the neck, shoulders and hips can typically be used in one of two ways - cut into roasts for low and slow cooking, or turned into ground meat. It's the latter that offers the most versatility, for ground venison can be eaten in a virtually limitless number of ways - from burgers to tacos to spaghetti to meat loaf, or in one of a million types of sausage.

A good, local meat processor can butcher your deer for you, but it's much more rewarding to do it yourself and, with the right equipment, easy and enjoyable. Plus, grinding your own meat lets you control what goes into it, ensuring a quality end product of delicious, healthy ground venison. When grinding at home, there are a few things to consider to get the best results - here are a few tips to get the best from your venison burger.
Tip: Shop all Game & Food Processing supplies and accessories here.
1. Keep Your Venison & Grinder Blade, Auger & Neck Assembly Cold
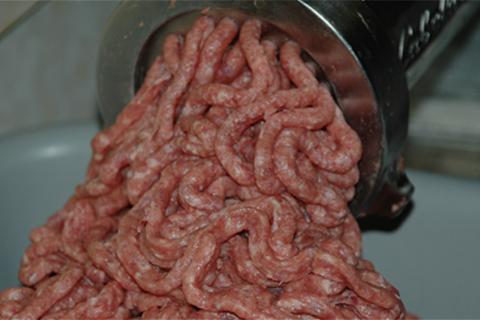
One of the most important keys to grinding your own venison is keeping everything below 40 degrees. About 30 to 45 minutes before you start, put the meat in the freezer so it gets nice and cold. Cabela's Commercial-Grade Grinders like the Cabela's Pro Series DC Meat Grander are powerful enough to grind even partially frozen meat, so the colder the better. If you have room, also put the grinder's blade, auger and neck assembly in there as well. This will keep the meat cold, allowing the grinder to cut the meat cleanly, rather than smearing it. As the temperature rises, the protein and fat separate. In the butchering business, this is known as "breaking." Thankfully, it's easy to prevent by keeping everything ice cold throughout the process.
2. Considering Adding Fat to Your Venison

Sampler
Venison - whether it comes from a deer, elk or moose - is extremely lean, resulting in a ground meat that dry, crumbly and lacking in flavor. Mixing in extra fat during the grinding process is an easy way to combat those three evils. There are several options when it comes to adding fat, and it really comes down to personal preference. I like pork butt, which despite its name, actually comes from the pig's shoulder area. It's an inexpensive cut - you can often find it on sale for less than a couple dollars per pound, and it has the right amount of fattiness.
Other good sources of fat for making wild-game sausage include beef tallow and even bacon ends and pieces, all of which should be available from the butcher at your local grocery store. The amount of fat you include with the meat is up to you, but remember the more fat, the juicier the ground meat. A ratio one-third to one-quarter part fat to each part of venison is a good starting point.
Tip: The Cabela's Open Season Mini Seasoning Sampler is especially suited to enhance wild game as well as beef, fish, and poultry. The sampler combines Cabela's Kansas City Rub, Roasted Garlic and Beer, and Mountain Man Bourbon seasoning so you can experiment with all of these great flavors for your next barbecue at home, the cabin or RV.
3. Grind the Venison Twice
When you bought your grinder, it probably came with at least two different grinding plates, or dies - a coarse die, with holes that measure about one-quarter of an inch, and a fine die, with one-eighth inch holes. You might also have a medium grind die that falls in the middle of those two. Starting with the coarse grinding plate, followed by a second grind with the finer die helps break down tougher cuts of meat and slices through stringy sinew. Place the blade on your auger, put the plate over the top of it and then secure everything down with the retaining ring. You want to make sure everything is nice and tight so the blade and plate can work in tandem to give you the best, cleanest grind possible.
- 46185 views