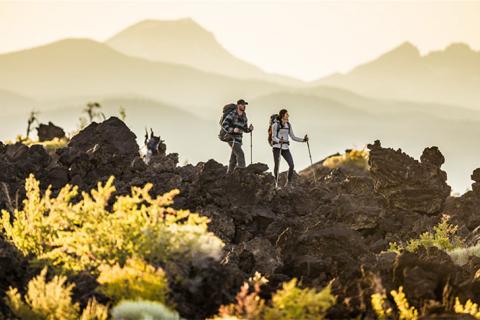
In this how-to program we will focus on hiking and all of the basic skills and hiking equipment, clothing and boots you will need to have for a great new outdoor experience with friends and family.
INDEX: Quick links in this guide to learn how to:
Planning & Packing for a Hike
Choose the Right Hiking Boot or Shoe
How & Why Dressing in Layers to Hike is Important
How to Use a Map and Compass
How to Stay Properly Hydrated
Pack the Best Hiking Snacks
Safe Hiking Gear & Supplies
Where to Go for a Great Hiking Adventure
How to Keep Kids Motivated While Hiking
Begin by Planning the Hiking Trip Early
One of the biggest ways to be successful in any outdoor activity is to plan ahead. Here are the four key planning steps.
 Plan for the weather: Is there a chance of rain and flooding? What are the high and low temperatures expected for the days you plan to be out?
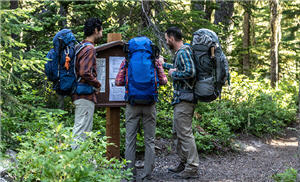
Gain knowledge of the location: Let's assume you're planning to explore a national park. You can begin by visiting the website, social media, blogs, and asking local outfitters and others that have visited the location.
Can you think of some things that would be beneficial to know about the location where you will be hiking or camping?
- Are there marked trails?
- Does the campground offer electric hook-ups?
- Can I bring my dog?
Tell someone before you leave: As a safety precaution always tell someone where you will be staying and the route you will be hiking This is important just in case you were to get lost or hurt, someone would know where to begin looking. Another key safety tip is to invite someone to join you. Two hikers are safer than hiking alone.
Tip: Beginners Hiking Guide: Hiking Tips, Safety Tips & Checklist
Tip: Explore some of the most popular national parks or browse the full list of all the parks in the National Park System here
Remember to Pack the Right Hiking Essentials
Just like many outdoor outings, packing your hiking gear can make or break your experience particularly if your are taking the kids.
One of the first things to consider is the proper footwear. When you hit the trail, you don’t want to think about your feet. It’s all about taking in the view, the wonder of nature along the way, and the beauty of being out there. A hiking boot that hits all the marks when it comes to comfort, fit, and performance is the way to go.
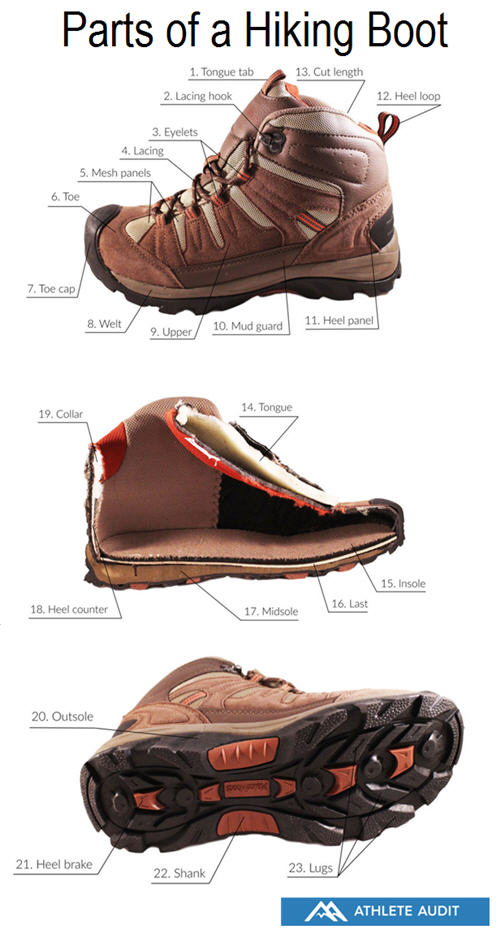
How to Choose the Right Hiking Boot or Shoe
When choosing your hiking footwear you need to consider 4 different things.
1. Destination: Think about where you will be hiking and what type of terrain you will be in. Will it be desert, mountain, water, gravel trail or a paved trail?
2. Boot Fit Considerations: The arch height, foot width, injuries or disabilities all factor into getting the most comfortable hiking boot fit possible. For example:
- Low Cut Hiking Shoe or High Cut Hiking Boots - Consider wearing a mid-cut-hiking boot they are the go to shoe. This will help protect you from the elements and animals and help with stability, especially if carrying a heavy load.
- Hiking Boot Mid-Sole - The mid-sole of a boot provides cushioning, buffers feet from shock and mostly controls the boot’s stiffness. You may think stiff boots can't be a good thing, but for long hikes on rocky, uneven ground they can mean better comfort so your feet won't wear out and stability.
- Hiking Boot Outer Sole - Two more boot safety considerations for choosing a hiking boot or shoe. A snug fit at the heel. This enhances the heel brake which is the raised heel zone of your boot. This area helps to reduce the chance of sliding and falling on steep descents. Number two is the lug pattern and depth of your hiker. Lugs are the bumps on the outer-sole foot bottom. If you're backpacking or mountaineering you'll want deeper and thicker lugs for improved grip. Also, lugs spaced widely provide good traction and will shed mud more easily.
Tip: Check out the Anatomy of a Hiking Boot by Athlete Audit
Tip: Backpacking 101: Planning & Preparation
3. The Type of Hiking Trip You've Planned: Are you doing an overnight hike and need a tent? Might you be exposed to wet conditions like rain or crossing rivers and streams? Day and night temperature highs and lows are very important for your physical comfort and hydration.
Tip: Buying a Tent? Here's a Guide to Make the Perfect Choice (infographic)
4. Waterproof Boots and Shoes: Generally recommended if hiking on an overnight trip. Wet shoes and feet can ruin a trip.
5. Always Try on Boots and Shoes: Try on at least two different pairs to compare the contrast in fit, comfort, and stability. Hiking boots should fit your foot snug everywhere and never tight plus plus they should have room to wiggle your toes. For a real feel, try them on with the socks you will be wearing. Best time to try on shoes is at the end of the day (after feet swell).
Tip: Another test of worthiness is to mimic some of hiking conditions by trying your boots on with a backpack and walking around the shoe department. See if you can find a few stairs to replicate hiking situations. Once you've decided, wear them often to break them in prior to your hike.
Our Experts Recommend the Targhee Boot Collection From KEEN
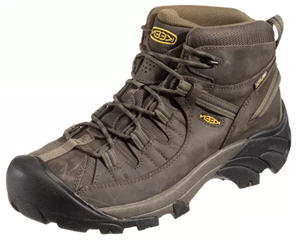
Boots for Men.
Bass Pro Shops/Cabela's Exclusive!
The award-winning Targhee collection offers trail-tested favorites for men and women. These waterproof hiking boots and shoes are breathable, durable and designed to feel like a four-wheel drive on any trail. They have multi-directional outsole lugs to ensure a sure grip on rough trails. Outsole easily sheds dirt and debris. The dual density compression molded EVA midsoles provide support and cushion.
Tip: Click here to shop all Keen Shoes & Boots on basspro.com or visit cabelas.com to shop, use keyword KEEN.
Watch Video: CONSCIOUSLY CREATED FOR A BETTER PLANET by Keen
Now that we have your feet covered let’s look at clothing and the importance of layering for hiking comfort and safety.
How and Why You Should Dress in Layers for Hiking
Layering is wearing a combination of clothes worn on top of each other to regulate your body temperature, so you don't overheat or get too cold. Also, it helps with moisture wicking to keep the skin as dry as possible to help prevent blisters and chafing.
Dressing in layers must match the climate conditions you are in, your activity level, and your thermostat.
You might be wondering why not just wear 100% cotton? While cotton still a fabric of choice in casual wear, it has no real place for the outdoors anymore. Cotton has no wicking features; it stays wet longer, which can make you chilly, especially if it is windy. Instead, you need to look for synthetic fabrics "blends" of cotton and polyester. Today you can even find clothing with a UPF value (ultraviolet protection factor) for sun protection and insect repellent.
Layered clothing breaks into three principal layers: Base, Mid, and Outer. These three layers act in unison, but individually each layer performs specific functions.
How Do You Layer Up for Hiking in Any Weather?
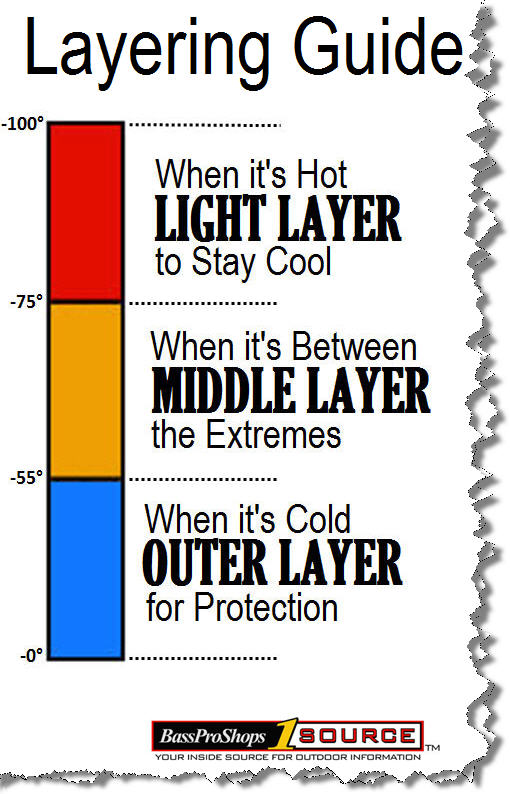 Hot-Weather Layers
Look for light colored clothing like white, khaki or tan that is loose-fitting synthetic fabric blends like nylon and polyester. For hot weather, cotton can be worn as well. Your clothing should allow for breathability for comfort from sweating in your clothes.
Rainy-Weather Layers
Lightweight hoodie, well ventilated lightweight waterproof and breathable rain jacket and pants. Plus waterproof hiking boots or shoes and waterproof gaiters. Consider base or mid-weight layers, your goal is to cover your skin with a stretch layer to keep a jacket off your skin.
Layer 1: Base Layer - For Wicking Away Moisture
The base layer is the wicking layer that wicks moisture away from the skin. The base layer is the first layer of clothing your wear that directly contacts your skin. A base layer should fit snug. This fit lets the material quickly wick away moisture from your skin keeping you dry and warm. Base layers come in three different layer weights; lightweight, midweight and heavyweight. Light weight has better moisture wicking with less insulation, and used in warmer areas. The heavyweight more insulation less moisture weekend, used in colder climates.
Shop bass layers for men, shop base layers for ladies, shop base layers for kids
Layer 2: Middle Layer - For Insulation
The middle layer garments are for insulation and warmth by trapping the warm the body generates. Polyester fleece is a common middle layer that stays warm even if it gets damp, and it dries fast. Fleece also breathes well, so you’re less likely to overheat in it.
Layer 3: Outer Layer - For Protection
The outer layer garments are designed to protect you from the weather. This layer is commonly called the shell as it protects against wind, rain, and snow. For example you would use a waterproof jacket for rain or windproof or down jacket for the cold.
Now that you are properly dressed let’s talk about the importance of knowing where you are during your hike all of the times.
Easy Orienteering Tips Anyone Can Use
 In this age of digital technology, stand-alone GPS devices and smartphones with GPS technology are increasingly people’s go-to navigational aids. But over-reliance on these devices is increasing the number of mountain rescue across the world.
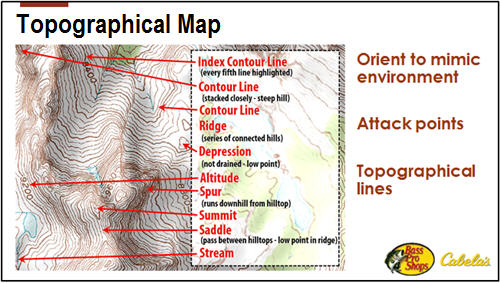
How to Use a Topographical Map
- When Hiking With a Map: To begin, you should orient to mimic the environment, which means if headed north, you will see the map right side up, while if hiking south, your map will be upside down.
- The Attack Point: This point on your map is the location in which you are hiking and will help guide you—for instance, a river or trailhead.
- The Topographical Lines on the Map: These lines represent the hills and valleys of the land. They also present you with some of the easiest-to-follow landmarks in any landscape. Knowing your starting location and ending location on the map, it is easy to choose routes that follow ridge-lines or valleys, or cross a certain number of ridges or hills, on the way to your end destination.

How to Use a Compass
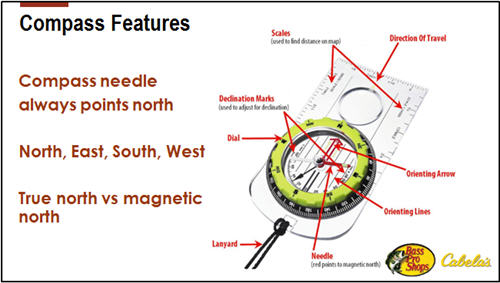 The first thing you need to know about your compass is that the needle always points North.
Compasses measure direction in degrees, which on a compass increase clockwise; East is at 90 degrees, South at 180, West at 270, and North at 360 or 0 degrees.
Practice With Your Compass at Home or a Park.
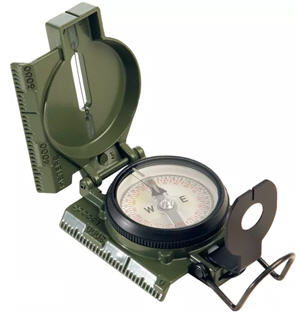
Use the compass to find the bearing by using an attack point. While hiking, this point could be a spot in your backyard or a special tree in the park. Point the arrow on the base plate toward the item. Then turn the dial of the compass until North aligns with the red tip of the compass needle. The arrow will point to a number in degrees on the dial; this is the bearing for the landmark.
On the trail, you need to be aware of the difference between true North and magnetic North and that it varies from place to place on the Earth’s surface. Topographical maps almost always note the declination in the map scale. While often only a minor deviation from true North, it’s worth noting on each map and making adjustments on a compass for long headings or if the declination is particularly significant.
Learning how to read a map and compass can seem daunting. But with practice, this skill is hugely beneficial on the trail and if you're lost.
Tip: Demystify Map and Compass With Easy Orienteering Tips
Let's move on to talk about the importance of stying hydrated on the trail
Staying Properly Hydrated is one of the Keys to Comfort and Performance
 No matter if you are going hiking, camping, or just playing in the playground, you should always bring water as it is essential to life.
To prevent dehydration, you need to drink water every day, and the hotter and harder you work, the more you will need to drink.
Participant Activity: Ask someone to come up and determine how much water you think they will need on a 4 hours hike in moderate temperature and terrain.
Plan for a half of a liter of water per hour in moderate temperatures and terrain
And if it is hotter or the terrain will be steep, then you will need to plan for more or bring something to purify your water. Even on a short hike, a few snacks are crucial to keeping everyone happy especially if you are taking the kids
What is the Amount of Water to Bring on a Hike?
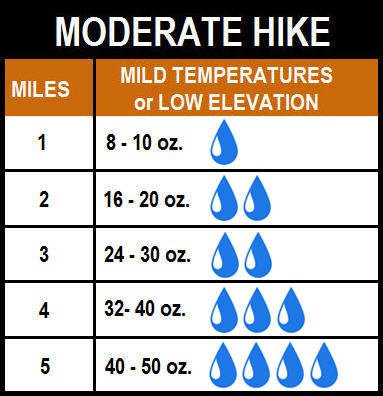
 Moderate Hike: Suggested amount of water to bring on a moderate hike up to 5 miles. The weather is temperate or the elevation is low. Amounts are based upon 16 oz.
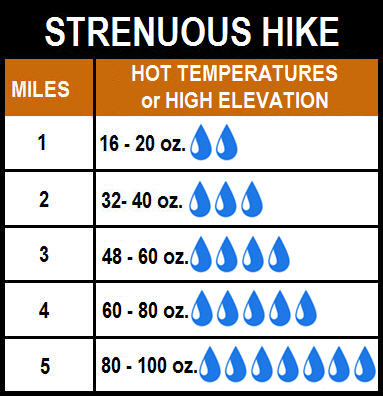
Strenuous Hike: Suggested amount of water to bring on a strenuous hike up to 5 miles. The weather is hot or the elevation is high. Amounts are based upon 16 oz.
Hiking Snacks are a Must on the Trail

Mix
Pack calorie-dense foods to keep you going throughout the day and provide you with that much needed energy required to get to where you're going. You should also carry an extra portion in case you are out longer than expected.
What are the Best Hiking Snacks to Pack?

Long distance hikers need to consume more calories because their body will start to burn both fat and muscle. They need to consume enough protein plus, by combining protein with carbohydrates, your snacks will feel more fulfilling. So, what do you pack? Here are some tips on the different types of fuel for the body.
Lightweight: Water is the number one contributor to dense food. Packaging being the second. Prioritize "dry" food and feel free to repackage it if the cardboard boxes and bagging is excessive.

Ready-to-eat: Focus on foods that require minimal preparation (and cleanup). You will be hiking in the daytime and will not want to set up the stove to cook and dishes to clean. Make sure your meals and snacks are effortless so you can keep moving. Even for dinner at camp, most backpackers only cook "one-pot-meals."
High levels of nutrition: Hikers can burn up to 6,000 calories a day. In short, you need to consume a lot of macronutrients to balance out the high burn-rate. High-levels of calories, carbohydrates, protein, fats, fiber, and electrolytes (mainly sodium, calcium, potassium, and magnesium) are a must.
Try to prioritize hiking food that provides at least 100 calories per oz.
Good Hiking Snack Examples are:
- Dried fruit like mango, apricots, dates.
- Nuts like almonds, macadamia, peanuts, pecans.
- Granola Bars
- Trail Mix
- Energy and Protein Bars
- Dehydrated Meals
Tip: 10 Tasty Backpacking Snacks
Tip: Good Convenience Foods for the Outdoorsman
Now that you are hydrated and refueled let’s make sure that you have the proper gear to be safe while hiking
Safe Hiking Essentials to Pack
Remaining safe while outdoors is essential as lots of the areas in which you hike to have limited access to emergency services. Here are some essential items to pack.
- Lighting or Flashlight
- Fire Starter like Coghlan's Fire Starter
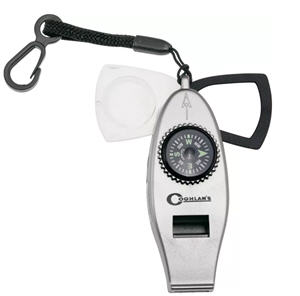
- Safety Whistle
- First Aid Kit
- Sunscreen
- Insect Repellant
- Knife or Multi-Tool
Now that we have gathered all of the needed supplies let’s take look at a couple of backpacks.
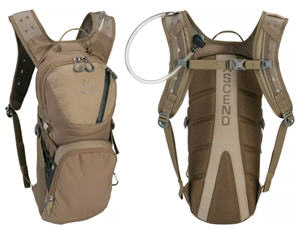
Ascend Current Hydration Pack Features
- Carry weight: 1 lb. Dimensions: 18"x4"x11". Imported.
- Handy 2L hydration system and gear transport for outdoor adventure
- 244 cubic inch of storage for gear
- Ventilated shoulder straps with sternum strap
- Padded air mesh back panel with ventilation channels
- 2 accessory pockets and 1 stretch stash pocket
- Side compression straps
- Rain Gear and dry fast
Shop Ascend Current Hydration Pack at Bass Pro Shops
Ascend Folsom Daypack Features
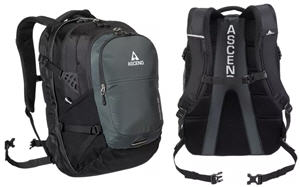
- Roomy and versatile daypack that handles weekdays or the weekend
- Versatile and roomy 4-compartment design - 2,380 cubic inches of storage
- Padded front compartment with organization pockets
- Padded shoulder straps with sternum strap
- Padded air mesh back panel with ventilation channels
- Removable waist belt and upper and lower side compression straps for stability
- Durable 420D nylon construction with YKK zippers
- Two stretch mesh pockets on the sides
- Padded haul handle on top
- Reflective webbing and blinker light attachment point - increased visibility
Shop Ascend Folsom Daypack at Bass Pro Shops
Where Can you go for a Great Hiking Adventure?
 There are 419 national park sites in the United States and 10,234 state parks . Our National Parks encompass more than 84 million acres in each state including Puerto Rico, the Virgin Islands, American Samoa, and Guam. National parks are owned by citizens of the United States and operated by the National Park Service, an agency of the Department of the Interior. The United States has 62 protected areas known as national parks and include "National Park" as part of the name. These are operated by the National Park Service, an agency of the Department of the Interior.
State citizens own the state parks in the state where they live. Some of the most beautiful land in America is in our national and state parks.
 There are also county parks within a state and city parks within cities.
Tip: Find your next adventure at www.recreation.gov
The chances are that there is a park close to where you live.
How to Keep Kids Motivated When Hiking
Hiking with the family can be a fantastic experience; here are some activity ideas to engage the kids while hiking in the outdoors.
- Play a nature "I spy" game
- Go birdwatching & take field guides
- Create outdoor games
- Go on a night hike
- Identify animal tracks
- Visit a nature center
- Look for decomposers
- Listen for animal sounds
- Create a nature scavenger hunt
- 4887 views