By wet wood, we mean fully dead wood, (usually dead for a year or more) that has been wet by rain or suffered some other soaking, not green wood.
Green wood, or live wood, should never be used for a fire. It will only make smoke and trouble.
We are building a modern fire in the modern world, so have matches or a lighter handy, rather than rubbing sticks together.
Also, we should work within a fire ring, or appropriate fire pit.
We should also use a fire-starter stick. These compressed sticks of tinder and paraffin should come with us on every camping trip.
This campfire will require three types of fuel:
Tinder
Use a firestarter stick, cotton balls, dryer lint, twisted paper, dry wood shavings or try
Wetfire tinder. Add a little cooking oil or petroleum jelly to the cotton balls or lint so they will burn longer.
Kindling
Find small dry twigs, less than finger thickness, and four to six inches long. Shave wet twigs down to the dry center with a knife.
Fuel Wood
These large wet pieces will eventually create all the warmth, cooking heat and a glowing bed of coals.
Step 1: Arrange the tinder and kindling
Build a teepee shaped stack of the smallest kindling twigs over a pile of tinder, or a fire stick, broken in half, with the pieces leaning up against one another in an "A" shape.
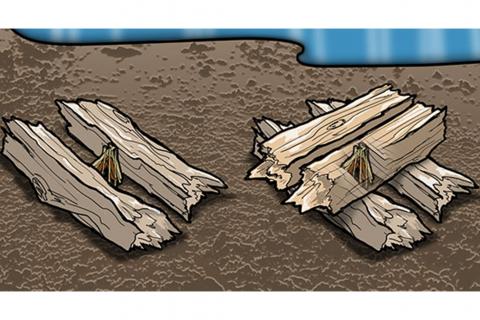
Step 2: Construct the fire’s base structure
Place two large pieces of wood on either side of the teepee of kindling, a hand width away from it and parallel to each other forming a hallway with the kindling at the center. The top edges of these wood chunks should be a little taller than the kindling teepee. If they are not, stack several pieces together, supporting them as necessary to achieve this height.
Position two pieces of wet fuel wood at a 90-degree angle on top of the base wood directly over the kindling teepee, leaving a finger width gap between them.
Step 3: Light and feed the fire
Now light the kindling, and when it starts burning, add more kindling sticks, paying attention to airflow through the stack. Let the little fire expand within the hallway, using the gap between the top pieces as a chimney.
As the little fire grows, the wet wood directly above and around it will begin to dry from the heat, and before long, it will catch fire.
Step 4: Continue building the fire, stacking wood to preheat and dry before it burns
Place two more pieces of wood onto the stack, at a 90-degree angle, and two more, at another 90-degree angle directly over the flames. Continue, building this log-cabin style stack of wood as the fire grows, each time positioning the new pieces so that they are cooked by the fire below.
Step 5: Maintain air flow
When the stack collapses the fire might smoke. Use a long stick or fireplace tongs to rearrange the wood to create airflow gaps within the pile of burning wood. As soon as airflow is restored the fire will stop smoking.
- 21029 views