|
|
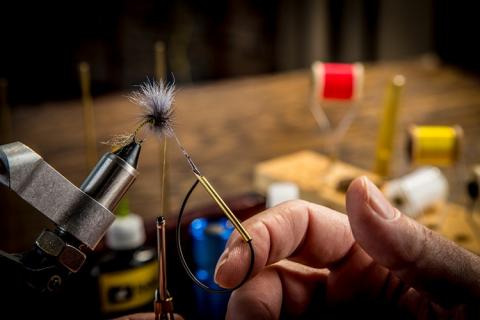
| A fly-tying kit is a good way for a beginner to get started. |
If you have ever looked into learning to tie your own flies for fishing you probably have become disillusioned by the sheer number of products said to be a necessity for novice fly tiers. In actuality, only a small number of these specialized tools are needed to get you started and tying confidently for years. Keep in mind that buying fly-tying equipment is different from buying other types of fly fishing equipment.
With all fly-fishing equipment companies around the world, improvements are constantly being made in their respective products, making the lifespan of the equipment you purchase very short. In this aspect fly tying equipment is very different.
Few significant changes have been made to equipment over the years and it is not unusual for fly tiers to keep purchased equipment for decades. With this in mind, it is a good idea to buy the best equipment possible that you can afford that will provide trouble-free service for years.
To better understand what the basic equipment for fly tying is, and what duties each tool performs, a separate section will be devoted to each of these specialized tools.
Basic Equipment
|
Fly-Tying Vise Probably the most important of all the items that you will be purchasing, the fly-tying vise is a tool that holds the hook so that you can dress it with varying materials. At a minimum, the vise you are looking to purchase should be able to hold the hook in place securely throughout a wide range of sizes. Ideally you want the vise you choose to be able to hold large size saltwater hooks (size 2/0) along with tiny midge hooks (size 22). If the vise you choose can not do this with one standard set of jaws then make sure that the vise is able to have interchangeable heads put in to hold all the differing sizes of hooks available. Another key feature that one should look for in a vise is the ability to rotate the hook while it is held in place. Many of the different techniques used in fly tying today involve wrapping materials around the hook shank and these types of rotary models make this process easy and fluent. The convenience and time saved by using this rotary component makes it a necessity for all beginners to have in the model of vise they are looking to purchase. The last consideration to make before picking out the vise you want is to decide what type of mounting system would best suit your needs. All vises come with either pedestal or C-clamp bases. Pedestal bases are simply a weighted base plate that the vise slips into. Despite the weight, pedestal type vises are great for travelers or people who do not have a set station where they tie flies consistently. It is very easy to find a space and set up these vises and begin tying. As for the C-clamp style of vises they are very light and hold the vise securely in place but always finding a table the right thickness to clamp these vises to can be a pain. |
|
Bobbin The bobbin is a fly tying tool that holds the spool of tying thread, floss, or wire. On the market there are basically two different kinds of bobbins: "thread" bobbins and "material" bobbins. As you accumulate more and more different colors and diameters of thread, switching spools of thread will become tedious. Having a few of each type of bobbin will make your fly tying faster and more fun. Some specialized bobbins are sold that have ceramic inserts placed into the bobbin tube to stop the thread tube from being scored and ruined by rough thread like Kevlar. |
|
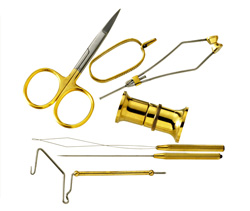
Hackle Pliers Hackle pliers are a set of very fine-tipped pliers for holding the tips of feathers so that you can wind them on the hook shank. A few different styles of hackle pliers are available on the market today, but in all honestly a set of pliers that holds the hackle tightly, has a small head for tiny flies, and a large ring so it can rotate on your finger is all you need. Rotary hackle pliers are also available, but are not a necessity for beginners because it a good idea to develop the skill of wrapping the hackle by hand. |
|
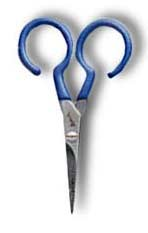
Scissors When selecting the pair of scissors that you are going to purchase, a few key considerations should be made. First of all the scissors should have a very fine tip and be extremely sharp. When clipping tag ends of thread or feathers, the sharper and more fine the scissors, the easier the task will become. Fly tying scissors that have serrated blades are also available and are a good idea for cutting rough materials and trimming spun hair. Serrated scissors last a long time but the problem is that once they begin to go dull there is not much you can do to sharpen them. Another consideration for scissors is the size of the finger holes. These holes need to be large enough to facilitate easy manipulation of the scissors. |
|
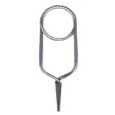
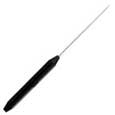
Bodkin
|
|
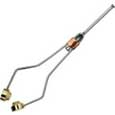
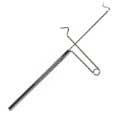
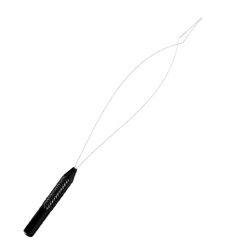
Whip Finisher The technique of whip finishing a fly can be quite intimidating to beginning fly tiers. The whip finisher is the tool that tiers use to knot the thread at the completion of a fly, so that even when stress is placed on the fly the thread will not come undone. There are a few different styles of whip finishers available on the market, but all do basically the same job just in a different way. When choosing a whip finisher a good idea is to go to your local fly shop and test out the different types. Whichever one makes it easiest for you should be the one you go with. |
|
Hair Stacker Being able to set the hair tips evenly is a basic necessity if the fly is to be properly proportioned and balanced. The hair stacker is the tool that the fly tier uses to perform this task. Basically this tool consists of two separate tubes, one large and one small that inlay with each other. The larger of the tubes is constructed with a bottom attached to it, while the smaller is open on both ends. To stack the hair all one has to do is insert some hair fibers into the top end of the smaller tube with the tips pointing downward. Just a few taps of the stacker on a hard surface is all that is needed to align the tips. Once the tips are stacked, simply pull the smaller tube from the larger one and remove the evened hair fibers and tie it in to your fly. |
|
Bobbin Threader This simple tool is used to pull the tying thread through the bobbin tube. It is not a necessity for fly tying but a bobbin threader makes threading your bobbin easy. This tool can be purchased, or one can be made with fine guitar string or wire. |
|
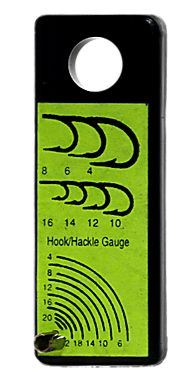
Hackle Gauge This tool is a must have for the beginning fly tier. When constructing a fly there is a direct correlation between the size of the hook and the size of hackle that is needed. In general terms the hackle should be approximately one and a half times the span of the hook gape. The use of a hackle gauge makes obtaining these proportions easy and straightforward. |

As a general rule, quality tools will allow you to tie faster and tie better flies. As such, you should strive to obtain the best tools your budget will allow. There is a wide variety of other tools that you can purchase for fly tying. However, the standard tools above are the most used and with them you can tie beautiful fly patterns with practice. You may want to consider other tools later as your experience increases but in the beginning it is best to master the use of these basic ones and develop your skills.
- 12240 views