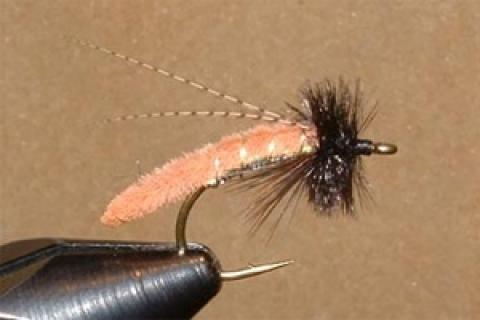
The Caddis Poopah is an extraordinary fly pattern designed with simplicity and functionality in mind. Looking at this pattern from a basic construction stand point, the fly is most certainly not complicated. Chenille, tinsel and peacock herl combine to make a sleek looking pupal imitation. Don't be fooled, though; despite its lack of complexity, the Poopah is extremely effective when hungry trout are in search of nymphs rising off the bottom.
The Poopah was originally created sometime in the early nineties by Tim Fox to entice the inhabitants of the Sacramento River. This pattern best imitates emergers that are in the process of leaving their shucks in search of places to spread their wings. The tying materials used are the key to the Poopah's successes. Ultra Chenille is a perfect match for simulating the shuck that the fly leaves behind, while the pearl tinsel body can pass for an air bubble produced in the molting process. The peacock herl, grouse hackle and wood duck fibers give this fly an overall buggy feel, making it one of the most enjoyable and productive caddis pupae patterns available.
Because fish are often at their most opportunistic feeding time just before and during the early stages of a hatch, it's extremely important to have a wide range of caddis nymph imitations in your fly box. Sizes in the 12-16 range are the most productive during the summer months (July to August) but in early spring (April to May) flies tied on heavy size 10 hooks can be deadly for lake-run steelhead. Matching your fly color to the natural nymphs found on the river bottom is always your best bet, but any Caddis Poopah patterns in olive, tan or orange should do the trick.
If you think you've stumbled on to the beginnings of a hatch, or if you are just prospecting new trout water, try fishing the Caddis Poopah. Nine foot fly rods and floating fly lines will present flies without difficulty, while standard 9 to 12 foot long nymph leaders should handle most waters you come across. The real secret to fishing the Poopah is getting your fly to drift drag free as long as possible in the strike zone. Fish will actively feed on nymphs that get dislodged from the bottom so getting your fly down to the depths where the fish are is of utmost importance. In deeper waters, lines weighted with micro shot one to two feet above the fly will be enough weight to get the fly down on bottom. It won't take trout long to tell a fly is just a cheap imitation if you can't get a drag free presentation. Upstream and across casts coupled to active line mending will give you your best chance at bringing a few more fish to hand.
| Caddis Poopah Materials List | |
| Hook | TMC 3761, 2487 or 2488; Sizes 12-16 |
| Thread | Olive Uni Thread 8/0 |
| Hackles | Black Ostrich Herl/Black Peacock Herl |
| Tail | Olive, Tan or Orange Ultra Chenille |
| Body | Pearl Tinsel |
| Antennae | Wood Duck Feather |
| Rib | Silver Round Wire |
| Beard | Hungarian Patridge Soft Hackle |
Step-By-Step Tying Instructions for the Caddis Poopah
|
Step 1 Place your hook in the vice and secure tightly in place. |
|
|
Step 2 Attach the thread to the hook shank at the 3/4 mark on the shank. |
|
|
Step 3 Clip a short piece of sliver wire and tie it down to the hook shank, covering it with thread until you reach the point above the barb. |
|
|
Step 4 Clip a second short piece of pearl tinsel and secure it to the hook shank at this same point — the point above the hook barb. |
|
|
Step 5 Wrap the tinsel forward covering the hook shank with a smooth even layer of tinsel making sure not to leave any uncovered spaces in the proceeding wraps. Stop just before you reach the 3/4 mark on the shank. |
|
|
Step 6 Clip a two inch piece of tan chenille and melt one end with a lighter so that you have a sharp melted point. |
|
|
Step 7 Tie this chenille to the top of the hook shank so that the melted tip extends just past the hook bend. |
|
|
Step 8 Wrap the silver wire up the body of the fly, tying the chenille to the hook shank. Space the wraps evenly using 4-5 wraps total. |
|
|
Step 9 Choose a Hungarian partridge soft hackle and loosely tie the tip of the feather to the bottom of the hook just in front of the chenille. Once the fiber is in place, lightly pull the stalk that is extending over the hook eye to flare the fibers a bit. Clip the excess and tie down the remaining fibers tightly. |
|
|
Step 10 Select a wood duck feather and remove the center stem so that you have a "V" shaped pair of antennae. |
|
|
Step 11 Place pair of antennae on the top of the hook shank and tie in place. |
|
|
Step 12 Select a dense peacock herl and tie it down to the hook shank at the 3/4 mark. Create a thick collar by making a few wraps around the hook shank, and then tie it off behind the hook eye. |
|
|
Step 13 Build a small neat head for the fly. Whip finish and cement. |
- 8885 views

