
Simplify the sighting-in process with a laser boresighter
 Science fiction writers conjure up a lot of exotic weapons using laser beams that capture our imagination, but engineers with a more practical mind have applied this clever light source to a number of ingenious outdoor applications that will serve you far better than a light saber.
Until the introduction of boresighters, shooters had to go through a timely and expensive process of shooting a target and lining up their riflescope until the crosshairs actually closed the gap between the fantasy of where you thought you were aiming and the reality of where the bullet hit. Early boresighters simplified the task, but newer innovations take you to the next level.
With these modern marvels you can cut that time down dramatically, and there’s another use that you may not have thought of that could be even more important in the field. I’ll get to that in a minute.
Before hi-tech boresighters came on the scene, the options were more basic but they’re still very functional.
 Mechanical boresighters are basic units that use a selection of arbors sized specifically for each caliber or one that is adjustable for shotguns. Once you select the appropriate arbor and insert it into the muzzle, the boresighter is attached to the arbor and aligned before you go through the adjusting process and head for the range.
First and foremost, regardless of the design, a boresighter is a tool that will get you close. You’ll still have to adjust windage and elevation, but the chasm that you have to traverse will be much less when you start out on the paper.
There are three types of boresighters, and each designer feel their model will give you the upper hand. These types include the cartridge laser that inserts into the chamber and shoots down the barrel, a laser that inserts into the muzzle bore and manual units that attach to the end of your barrel without being inserted into the bore. Shop all 3 types of boresighters at Cabelas.com.
Cartridge lasers
When you use them, you’ll notice a few differences that could be considered minor. Although they all perform the same basic function, you may prefer one above the other based on personal preference and your own particular firearm.
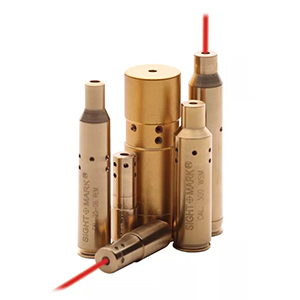
The cartridge type of laser is a concept that has gained a loyal following. These are caliber specific, inserted into your rifle or shotgun’s chamber and are illuminated when the bolt or breech is closed. The down side for shooters that have numerous firearms is that you have to buy one for each caliber or shotgun gauge.
Cabela’s has minimized the cost of the cartridge laser by offering a laser that is adaptable to different calibers, so you only have to buy the basic laser and the caliber cartridges you need.
 Muzzle-inserted lasers

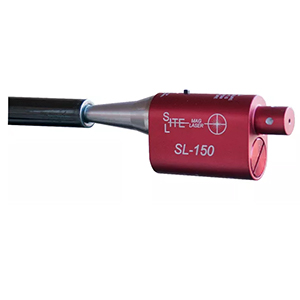
Laser boresighters that insert into the muzzle have either a tapered body or an arbor that is sized exactly for individual calibers. Those with a tapered body are adjustable to various calibers, and you need only select the right O-ring for each different firearm you want to use it with. It’s a simple concept, and one that works well, but you’ll find that the O-rings are pretty small and do come off occasionally when you remove them from the muzzle. While the O-ring will not damage the firearm if it goes unnoticed through the firing process, you’ll need to procure another O-ring before you can use it with that caliber again. There is a simple solution to this problem. Just check to make sure the O-ring is still attached when you remove the boresighter.
Another feature that you may want to consider is the Cabela’s combo laser boresighter and Scope Reticle Leveler. Having level crosshairs is critical to setting a scope accurately. If your scope isn’t exactly level you’ll notice that when you raise or lower the elevation that it changes the windage as well, due to the angle of the tilt. Naturally, this problem may not be very noticeable at close ranges, but it will be more pronounced at 200, 300 or more yards downrange.
With the Scope Reticle Leveler, getting your crosshairs set exactly level doesn’t have to be a guessing game anymore, and you’ll never have to tell yourself, "looks good enough to me". Simply set your firearm in a solid rest, check the level and match the reticle with the projected beam. Once you run through this easy set up, you can proceed through the boresighting process with the confidence that your scope isn’t just "good enough," it will be perfect.
Magnetic attachment
The final option for positioning a boresighter is the simple magnet. The main advantage of one of these designs is that it will fit any firearm from rifle to pistol and shotgun. Different models of this type of boresighter work the same, but for sake of example, let’s look at the Leupold Zero Point. Leupold’s new model is simple to use, accurate and lightweight enough to take into the field for an emergency check.
The first step with the Zero Point boresighter is to turn it on. This is accomplished by sliding the large switch located on the backside that faces away from the shooter. Next you adjust the vertical height of the boresighter until the grid is located in the center of the image viewed through your riflescope. On variable power scopes, you adjust the power ring to get the best magnification of the grid that produces a clear, lens-filling image. Once you’ve got the magnification adjusted, fine-tune the Zero Point’s orientation until both the vertical and parallel crosshairs are perfectly aligned. Now that you’ve got everything squared up, adjust the elevation and windage knobs until they’re perfectly aligned with the center of the boresighter’s grid and you’re ready for final adjustments and proofing.
Remove the boresighter and fire a shot at a blank target, at a distance of 50 yards. If you’ve done everything right up to this point, your shot will be somewhere on the paper, though not directly on the bull’s eye. Now, while being very careful not to move the firearm, reattach the Zero Point and square its grid to the scope’s crosshairs. Look through the scope and get the crosshairs on the center of the target. The Zero Point is small and you’ll be able to see its grid and the 50-yard target at the same time. Use the adjusting knobs to move the scope’s crosshairs over the bullet hole and your firearm should be perfectly zeroed. By noting the scale on the side of this unit, you can use it in the field to recheck your scope in the field.
With any other boresighter, there’s a simple trick that will serve you well. Once you’ve set up your scope and have it dialed in, shooting tight groups, go back to the boresighter. Note where the laser beam falls and make a mark on the target. Let’s say that the boresighter’s beam falls an inch below and an inch to the left of your final group. You simply put a mark on the target and take both on your next hunting trip. Then, should you drop or bang your scope against something hard, you can check it easily, and quietly by checking to see if the laser still hits the same mark. If the laser is off the original mark, then you can quickly bring the scope back into the same position and be confident that your next shot will be exactly as you intended.
This technique is particularly advantageous on a mountaintop, or deep in the woods during a hunt, where you definitely don’t want to start squeezing off rounds to make sure your scope wasn’t knocked off kilter.
- 7287 views