Like so many purchases today, buying a pair of hiking boots may seem easy, but one quickly learns that finding boots to fit your feet and your hiking needs is time consuming. Buying the right boots is a lot easier with some knowledge, and investing the time and money to find a good pair of hiking boots is a wise move for any outdoor enthusiast. Before discussing the three main types, or weights, of hiking boots and how to select a proper pair, let's examine how boots are made and some common boot terminology.
Tip: Shop Men's Shoes and Boots here
Tip: Shop Women's Shoes and Boots here
Tip: Shop Kids' Shoes and Boots here
The Boot "Upper" and Materials
The upper surrounds and protects the foot from the sole up. Uppers are built around a last, which is a mold used to shape the boot's materials. The materials used are leather, fabric or a combination of these two. Boot leathers vary, but three common types are: full-grain, reverse full grain, and nubuck. Full-grain, or top-grain, is taken from the cowhide's exterior and offers excellent durability. Reverse full-grain is full-grain turned inside out with a rough exterior. Nubuck leather is brushed to remove hide irregularities. these leathers offer good water repellency when properly treated. The types of fabrics used in uppers vary for each brand. If buying a boot with fabric in the upper, ensure it will breathe and be waterproof enough for your needs.
Other components of the boot upper include:
- The toe box that surrounds and protects your toes. The heavier the boot weight, the more protection.
- The heel cup, or heel counter, that holds and supports the heel, assisting in minimizing lift when walking and offers ankle stability.
- The heel padded collar that cushions the ankle and the Achilles tendon and limits rocks and mud from entering the boot during activity.
- The tongue folds under the laces when tied. A fully gusseted tongue joins the tongue to the leather body via flexible leather, keeping water and dirt out of the boot.
Some boots have liners built into the upper to increase water repellency. High-grade leather boots do not need them, but liners can be beneficial with fabric. Liners' drawback is they can limit moisture from leaving the boot.
Key Components of Hiking Boot Soles
 A hiking boot's sole has three components:
- The insole directly contacts and cushions the foot inside the boot and is often removable.
- The midsole stabilizes the boot and supports the foot with shanks providing stiffness. Shanks can be plastic or steel.
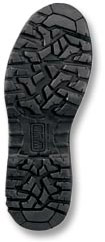
- The outsole touches the ground. They come in varying treads types, also called lugs, and are often rubber. A deep-lugged sole has deep treads and grooves for traction in unstable, rugged terrain. Shallow-lugged soles treads are not as deep and are built to navigate less aggressive trails.
Soles are attached to the upper with either stitching or glue. Stitching provides stiffness to the boot and is found in most heavyweight and some midweight designs. Stitching also allows worn soles to be replaced easily. Gluing, or cementing, soles to the upper is not as durable as stitching, but is less heavy, more flexible and often used in lightweight models. The rand is a piece of rubber covering the joint between the upper and sole. It protects the joint and must be a tight seal for proper water resistance.
The Boot's Weight is Important
The bittersweet fact of buying footwear is choice. Sometime choice can seem overwhelming, but it's a blessing after you've tried on five different hiking boots and the sixth pair fits. The first step to choosing boots is determining what you'll be using them for, factoring in: activities, terrain, and weight carried. Examining these three components will help narrow your search to one of three hiking boot types, classified by weight.
Lightweight Hiking Boots

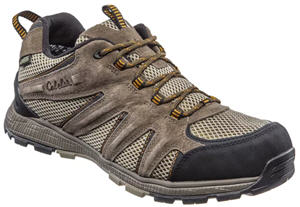
traing shoes like the Cabela's 360 Low
Hiking Shoe
These boots are designed for low impact hiking on terrain with gentle sloping hills and pre-defined trails. The lightest of the three, these boots usually come in a combination of leather and synthetic materials; this makes them light, but waterproofing can be difficult. Light hikers also do not require a long break-in period because of their flexible soles and boot materials. Unfortunately, light hikers often do not offer enough ankle support for carrying backpacks or hiking rugged trails. The boot's sole also tends to have conservative treads, or sole lugs.
Midweight Hiking Boots
These boots are designed for uneven terrain and moderate inclines. Heavier than lightweights, midweights have an average break-in period for boots. Midweights are often leather construction, providing greater abrasion resistance and better waterproofing ability. They provide comfort and cushioning for longer hikes and ample ankle support for carrying a daypack.Midweights contain stiffer midsoles and a more aggressive tread than light hikers. These boots are quite versatile, allowing you to hike a variety of trail types. To many, midweight hikers are the best choice for individuals wanting more support than a lightweight without going to a heavyweight hiker.
Heavyweight Hiking Boots
Heavyweight boots are made for hiking significant inclines and uneven terrain on and off trails. They provide maximum ankle support, allowing one to carry heavy packs on multi-day hikes. They have stiff midsoles and very deep treads. Usually all leather makes them very water resistant, a good choice for cold and wet conditions. Some will also accommodate crampons (snowshoes). Heavyweights often have the longest life span of the boot types. Some disadvantages to these boots are their significant break-in period, weight and limited breathability.
Boot Fitting Tips
Finding a proper fitting pair of boots is well worth the time, effort and money. To help you find the right boot, here are some fitting suggestions:
Try on footwear later in the day. Your feet expand slightly from walking or standing, and you will have a better sense of the boot's fit in the afternoon or evening. If you wear orthopedic devices replace these with the insole when testing boots.
Try on boots with the socks you will wear when hiking. Sock weight often corresponds to boot weight, lightweight socks for light hikers for example. Proper hiking socks are crucial to comfortable hiking and preventing blisters, so invest in socks to match your activities and intensity.
When boot shopping, ensure you test various brands. Each company builds boots on a different last and they all have varying values on boot: flexibility, width, arch support, padding, and so on. Trying on various brands is crucial to finding boots to match your feet.
Tip: To determine proper fit, begin by inserting your foot into an unlaced boot. Stand and push your toes to the front of the toe box. Next, try to slide your finger behind your ankle while keeping your toes as forward as possible. You should be able to fit one finger comfortably between your heel and the heel cup. If you plan on carrying heavy packs, two snug fingers would be a minimum. Do this test for both feet as they can vary in size, until you find an appropriate length.
Tip: To check the width, bang your heel into the back of the boot and lace it up. The edge of the tongue and eyelets should run parallel, or move slightly outward, from toe to the boot top. If the edges get closer, the boot is likely too wide for your foot. Excess material hanging over the sides of the sole is another sign that a boot is too wide.

step before attempting long or difficult
hikes.
Tip: Another method for determining fit of length and width is to remove and stand on the insole. Observe how much room is between the sock and the edge of the insole. Too much or too little is a sign of a bad fit.
Once you have a few pairs of boots selected, it's time to start walking. Walk with full strides and feel how the boot moves. "Is your arch supported?" "How does the leather bend above the toe box?" "Are any areas constrictive or too loose?" If you notice discomfort, move to another pair. Minor annoyances will lead to major discomfort after miles of hiking.
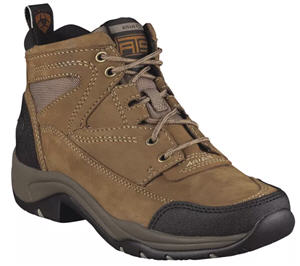
Tip: The Ariat's Terrain Endurance boot delivers great support and comfort for a woman's foot on the most grueling and rugged terrain.
When walking pay attention to your heel. There should be minimal lift in your heel and if it is moving a lot you need a smaller size or a different style. Adjusting the lacing tension when walking can sometimes make a difference but major tension alterations indicates the boots do not properly fit.
Next, walk up and down an incline, or slant board (if available at the store). If your toes strike the front of the boot, you need a larger size; the hitting will be compounded if carrying a pack. Try stairs and any other surface that may mimic the trails you intend to hike. If possible, walk for a half hour with the boots on, paying close attention to how they feel.
Once you've found a pair that your comfortable with, take them home and wear them around the house several times to verify the fit before breaking them in on the trails.
How to Break in Hiking Boots
Properly breaking in boots is an important step before attempting long or difficult hikes. Light hikers can be quickly broken in with timelines similar to running shoes. Mid and Heavyweight hikers require more time. To break-in boots, start with short walks and hikes, slowly progressing to longer hikes and rougher terrain. The stiffer the boot, the more break-in time required. You can also use leather conditioner to soften pressure points in the upper. If you plan on carrying a pack, break-in your boots on several hikes first, then start wearing your pack. Ensure you wear your pack as part of your boot break-in process.
Care and Maintenance of Your Hiking Boots
Caring for your boots will ensure a long lifespan. Apply a waterproofing treatment to new boots before taking them on the trails. Various products are available on the market, and boot manufactures will likely suggest a recommended product to be used. Water- or wax-based waterproofing treatments are two of the more common product types available. Water-based products containing silicon are quite popular. Applied to damp boots, the leather absorbs the solution as it dries. Wax-based products are applied to dry leather. Be careful with wax-based products as they can compromise the breathability of the leather, but waxes are great when hiking in very wet conditions. To test if products will darken color, apply the product to a small section of leather before treating the entire boot.
- Clean boots after every hike by lightly brushing away loose debris and washing off stubborn dirt with a soapy rag. Leaving mud on boots draws moisture from the leather, weakening it and reducing its water-repelling abilities.
- Wet boots should dry at room temperature; heating boots draws moisture from the leather and can weaken glued soles. Finally, condition your boots at least once a year. Conditioning your boots will restore moisture to the leather, prolonging their lifespan.
A proper fitting pair of hiking boots quickly become a treasured item for novice and experienced hikers alike. Spend the time and money to purchase a pair that suits your hiking needs and are designed to best support your foot.
- 7625 views

