Fly tying as a whole is not a difficult process, but rather the development of several skills that require patience and practice. Throughout the early stages of your tying career, you'll discover many different techniques that add particular characteristics to the flies you create. You'll also notice that certain fly tying techniques get used repeatedly when tying specific types of flies, such as the swept hackle collars found on wet flies, roughly dubbed bodies on nymphs and upright wings on dries. If you become proficient at these techniques early in your tying career, recreating famous patterns or local favorites will be much easier.

Setting upright wings is a technique tiers use to bring dry flies to life. Some of the most famous dry-fly patterns have upright wings as part of their construction, including the Royal Wulff, Humpty and Quill Gordon. Mastering this skill allows you to place V-style wings made of either hair or feather onto the top of the hook shank. Typically found on patterns used to represent mayflies, this wing style (especially when tied in white) helps anglers easily identify their fly as it moves atop flowing waters.
Fly Tying Materials List for Upright Hair Wings
| Hook | Dry Fly Hook, Siz 10 |
| Thread | Uni Thread, Size 8/0 |
| Wing | White Calf Tail or Wood Duck Flank |
Step by Step Instructions to Setting Upright Hair Wings
|
Step 1 Secure the hook in the vice. |
 |
|
Step 2 Attach the thread to the hook shank, just above the half-way point. |
 |
|
Step 3 Clip a small cluster of white calf tail (1/2 the width of a pencil) and place it into your hair stacker. |
 |
|
Step 4 Tap the hair stacker on the table a few times to align the tips. |
 |
|
Step 5 Measure the aligned tips to the hook shank. (The wing should be about the same length as the hook shank.) |
 |
|
Step 6 Place the calf hair on the top of the hook shank at the 2/3 mark, then tie it down to the hook shank with three wraps of thread. |
 |
|
Step 7 Cut the tag ends of the calf tail diagonally, then cover the ends with thread. |
 |
|
Step 8 Bend the wing backward with your free hand and place a few wraps of thread in front of the wing to hold it upright. |
 |
|
Step 9 Split the wing into two equal portions, then run the thread through the middle of the two wings. |
 |
|
Step 10 Hold the LEFT wing with your free hand, then wrap the thread around the base of the wing, bundling it together. |
 |
|
Step 11 Hold the RIGHT wing with your free hand, then wrap the thread around the base of the wing, bundling it together. |
 |
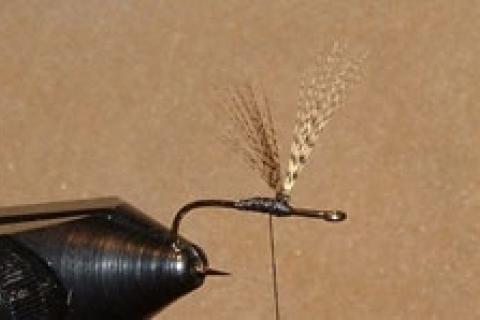
Step by Step Instructions for Setting Upright Feature Wings
|
Step 1 Select a wood duck flank feather (or other soft hackle feather) and strip the fuzz from the bottom of the feather. |
 |
|
Step 2 Measure the feather tip to the hook shank. (The wing should be about the same length as the hook shank.) |
 |
|
Step 3 Secure the feather to the top of the hook shank at the 2/3 mark on the shank, then cut off the tag ends of the feather. |
 |
|
Step 4 Lift and pull the wing back toward the hook bend, then place a few wraps of thread in the front of the wing to hold it in an upright position. |
 |
|
Step 5 Split the wing into two equal portions and run the thread through the middle of the two wings. Wrap the thread around the base of each wing a few times to keep the wing bunched together and set in place. |
 |
- 8794 views