So, do you know what a rocket stove is?
Whether homemade or commercially designed and manufactured, a camping or outdoor rocket stove burns a small amount of small pieces of wood to create and channel a lot of heat … fast. They can be excellent cooking stoves for doing things like boiling water or frying in a skillet if you build it in a way to control the amount of air pulled into the fire and up through the chimney. The more air, the hotter the fire burns. The less air, the cooler it burns.
It’s called a “rocket” stove because when positioned with a good breeze taking air through the feed door, into the combustion chamber, and up the chimney, it will roar like a rocket engine. And you’ll be cranking out an amazing amount of heat with just a little bit of fuel.
If you want a rocket stove for a campsite you use regularly or even for your backyard cooking area, here’s a way to build one quickly and inexpensively with cement blocks, patio pavers, and bricks. Though you can quickly assemble and disassemble this version of the rocket stove, you won’t want to tote it around in your pack! The commercial designs are better for that.
Materials for Your DIY Rocket Stove
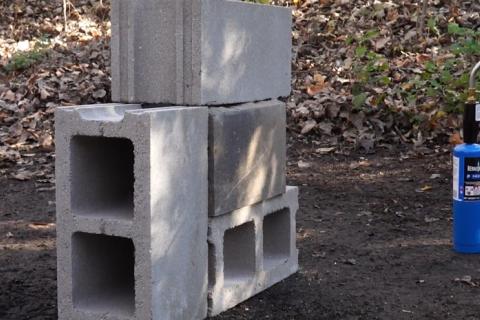
The materials you’ll need are three cement blocks (a.k.a. cinder blocks or concrete blocks) two patio pavers, and a brick. If you have them, a few extra bricks will help with cooking and controlling the airflow.
WATCH VIDEO: This video demonstrates how to build the "4 Block" Rocket Stove
Step-by-Step Instructions to Build an Outdoor Cooking Rocket Stove
Click here to print step-by-step instructions for building your own rocket stove

10 Steps to a DIY Rocket Stove
1. Clear an area where it’s safe to burn. Remember, the rocket stove design directs a lot of heat upward, so you need to confirm at least eight feet of clearance. More is better.
2. Lay one cement block in the center of the cleared area with one flat side down the other facing up.
3. Next, stand the brick on end over, inline with, and centered on the center support of the cement block below it.
4. Set the patio pavers on edge on both sides of the brick so their edges are even with the front of the cement block below. This creates your combustion chamber.
5. Stand another cement block on end in front of this combustion chamber so the upper hole in the block leads into it. This is where you’ll feed the fuel into the fire.
6. Finally, set the third cement block on top of the stack in position for the hole on the end toward the front of the stove to serve as your chimney.
7. Place tinder, kindling and small dry sticks into the combustion chamber and up into the chimney, then light it through the feed door. A blowtorch works really good for this.
8. Once that initial load burns down, add more fuel through the feed door as needed.
9. Place your skillet or kettle over the chimney, but don’t cover the opening completely or you’ll smother the fire. If you have a couple more bricks you can elevate the cooking vessel on them above the chimney to keep flowing well.
10. Regulate the amount of air the fire gets by partially blocking the feed door with other bricks or a rock. This is what will control how hot the fire burns.
This video demonstrates how to build the "4 Block" Rocket Stove
- 47754 views